Creatio / Hubspot Essentials
 Note: Before beginning it is important to understand that while this is a prebuilt integration it is highly recommended that someone who is familiar with both systems, their databases and your processes perform the implementation. It is also recommended that thorough testing be done prior to turning the integration on. Improper implementation can result in unwanted records being entered in your systems.
Overview
With your Creatio Connect Professional Edition (or higher) subscription, you have free access to our Creatio Connect Essentials pre-built integrations. This article discusses steps necessary to implement the Essentials bundle for Creatio and Hubspot Marketing Automation.
Once you have subscribed to Creatio Conncet you will be given a document that explains this integration in detail so you know exactly how the integration works. It will also help make sense of some of the information below.
Hubspot is cloud based and very easy to connect to. Creatio can be on-prem or Cloud and Creatio Connect supports both. Please see the Creatio Connector article for more information.
This integration does require the installation of a Creatio Bundle that implements necessary schema changes. The Essentials package is copied into your instance by the Creatio Connect team. You will need to request the Creatio bundle and the Essentails package from the Creatio Connect Team.
Integration
Preparation checklist
Prior to beginning the implementation of the Hubspot / Creatio Essentials, please gather the following information:
- User credentials for Hubspot and Creatio
- Decide which Hubspot and Creatio user accounts you are going to use and obtain necessary login information.
- Users must have xxxx rights.
- Internet access to Creatio
- If Creatio has been
deployed locally, provide Creatio Connect iPaaS appropriate access to Creatio
REST API. Please talk with your Creatio Connect representative to discover which connectivity options are appropriate for your organization.
- Creatio Connect User Credentials and Creatio Bundle
- Register
for Creatio Connect account – access can be requested at https://designer.creatioconnect.com
- Request the Creatio Bundle and Essentials package from the Creatio Connect team.
- email support@creatioconnect.com and ask them to:
- Copy the Essentials package into the Creatio Connect instance you just created
- Email you the Creatio Bundle necessary for this integration
4. Creatio Connect System Variables
You will need to get the following information to adjust the System Variables when the time comes. If you do not know what these values are please consult your Creatio Partner for assistance.
Creatio Connect Essentials Setup: Creatio - Hubspot
Creatio Schema Modification
In order for the Creatio - Hubspot integration to function properly, updates need to be made to Creatio. Below are the steps to update Creatio:
- In Creatio, navigate to an existing Activity. If no Activity exists, create one.
- Select the View drop down from the upper left corner. This will take you to the Section Wizard.
- Drag the String entity from the left menu to the
main view
- Go back to the Section Wizard main view
- Save the changes by selecting Save
- Navigate to the Activity, you will see the new
field.
Now Creatio is configured to work with the Essentials Hubspot integration.
Setup Connectors
1. Create connector for Hubspot per these instructions.2. Create connector for Creatio per these instructions.
Adjust Creatio Connect System Parameters
Now that you have your Connectors configured, go to Projects. You should see the Hubspot & Creatio Essentials Project that the Creatio Connect team uploaded into your instance. Double click to open. The first thing to do is to adjust the parameters in this project to fit your needs.
1. Navigate to the Project’s Variables tab2. Modify the server time offsets to reflect the time differences of each server3. ServerTimeOffset-HubSpot – typically US Central time4. ServerTimeOffset-Creatio5. Creatio Connect iPaaS is on US Central Time6. Change ClosedWon and ClosedLost Opportunity Type Ids if different from current selection7. Specify User Ids for each Creatio Connect user8. Specify the default sales representative for Creatio. This will be used to assign the Leads.
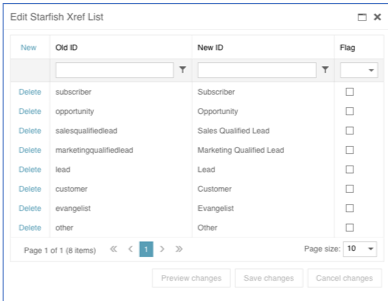
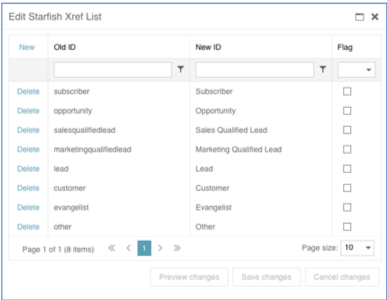
Configure Cross References (Xrefs)
To learn more about cross references, please refer to this article.
1. Navigate to the Projects Xref Lists. Two lists
will need to be updated to reflect process flow across each system.
2. Select leadstatustype
3. Modify the cross reference pairs as required to
reflect your workflow
4. Select Leadcycle Stage –
Creatio to HubSpot
5. Modify the cross reference pairs as required to
reflect your workflow
Testing
It is recommended that you test your integration thoroughly to make sure it is performing per your requirements.
Set Job Schedule
Hopefully at this point you have configured your integration and tested thoroughly to make sure it is funtioning properly. Now you are ready to go-live. This means you can set an individual schedule on every job in the Project depending on your needs.
- In your Hubspot & Creatio Project open the “Select the HS Contact -to- CRM
Contact” job.
- Select the Schedule tab
- While in this view, you
can modify the schedule frequency for the integration.
- The HS Contact -to- CRM
Contact Job is the start of a Job Chain. Select Schedule Enabled.
- Select the time interval,
Every 10 minutes is common.
- Select End of Run for
the Reschedule From
- Leave thread count at 1.
Since all of the integration jobs are in a chain, setting the schedule on the first job is all that's necessary.
Setup Monitoring
Creatio Connect has the ability to monitor for issues with your integration and notify you. Please read more about that in the Monitoring article. The Watchdog portion of this article does not apply to this integration, it is for on-prem installations of Creatio Connect only.
Congratulations! You have officially integrated your Hubspot and Creatio. We hope it is extremely useful for your team.
Related Articles
Hubspot Connector
Additional Documentation This Connector is based on the Hubspot ADO.NET Provider by CData. For additional help, including Connection String parameters, please see: https://cdn.cdata.com/help/DHG/ado/ Hubspot Connector Note: As of September 8, 2020 ...Connecting to HubSpot
Follows these steps to connect to HubSpot While in the Creatio Connect Designer, navigate to the Connections tab Select the HubSpot connector that you will be using for the integration If no HubSpot connector appears in the list, create a new ...Connecting to Creatio
Follow these steps to connect to Creatio: While in the Creatio Connect Designer, navigate to the Connections tab Select the Creatio connector, if a connector already exists, that you will be using for the integration If no HubSpot connector appears ...Creatio Connector
Creatio Connector Versions Connect Creatio has two connector types for Creatio. OData: Allows for more complex querying. 4-6k records per hour Data Services: Faster than OData. Approx 30k records per hour Creatio (OData) Advanced Filtering Sometimes ...Creatio Connect Designer 2-factor Authentication (2FA)
The latest update for Creatio Connect Designer has 2-factor authentication (2FA) enabled. Update applied to Creatio Connect Cloud servers March 26, 2020. This feature is part of the Creatio Connect product strategy to continually improve your ...